Programming just like life is an ever learning process. Daily you learn new things which you use later and this is not specific to coding even in your normal life, you learn a hack or a recipe or anything else. How do you record it for future reference? Jot it down in a journal or on a sticky note or use some cloud-based notes like google’s keep or apple’s notes. There is nothing wrong with any of these methods. But there is a geeky way to do this i.e. creating a GitHub repository and journaling the simple and shortcodes or hacks, which don’t deserve a full blog post of their own.
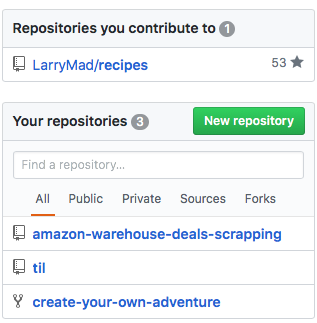
So in this post, I will guide you through creating your own “Today I Learned” aka “til” repository like this on GitHub which is inspired by Today I Learned by HashRocket and thoughtbot/til . While doing so, you will be learning the following:-
- How to create a local git repository?
- How to host the repository on GitHub?
- How to automatically update the README.MD using python script created by Jim Anderson ?
- How to use Markdowns to write README.MD?
So, let’s get into the coding part. First of all, create an empty directory (I named it “til”) and initiate the git repository
$ mkdir til
$ cd mkdir
$ git init
Now, create three new files inside the til directory namely README.md, LICENSE and createReadme.py
$ touch README.md LICENSE createReadme.py
Choose the proper license for your repository. You can refer to this link on GitHub . Open the LICENSE file in your favorite editor and add the details of your license.
You don’t need to do anything with the README.md file as we will be creating it automatically using the createReadme.py file. So, open the createReadme.py file and add the following lines of code:-
#!/usr/bin/env python
''' Simple script to auto-generate the README.md file for a til project.
    NOTE: Someone who wanted to be fancy would actually use a template engine
    for this, but this seemed like a task for which it is best to only require
    python.  This is not a general purpose script, but tailored for the format
    being used for "Today I Learned" repos.
    Apply as a git hook by running the following command in linux:
        cd .git/hooks/ && ln -s ../../createReadme.py pre-commit && cd -
'''
from __future__ import print_function
import os

HEADER = '''# TIL
> Today I Learned
A collection of concise write-ups on small things I learn day to day across a
variety of languages and technologies. These are things that don't really
warrant a full blog post.
'''

FOOTER = '''## Usage
After creating a new entry, run `./createReadme.py > README.md` to regenerate
the readme with the new data.
If you are using git, you can install this script as a pre-commit git hook so
that it is autogenerated on each commit.  Use the following command:
    cd .git/hooks/ && ln -s ../../createReadme.py pre-commit && cd -
## About
I shamelessly stole the above idea from
[jima80525/til](https://github.com/jima80525/til) who claims to have stolen
it from others.
## Other TIL Collections
* [jima80525/til](https://github.com/jima80525/til)
* [Today I Learned by Hashrocket](https://til.hashrocket.com)
* [jwworth/til](https://github.com/jwworth/til)
* [thoughtbot/til](https://github.com/thoughtbot/til)
## License
© 2017-2018 Udit Vashisht
This repository is licensed under the MIT license. See `LICENSE` for
details.'''


def get_list_of_categories():
    ''' Walk the current directory and get a list of all subdirectories at that
    level.  These are the "categories" in which there are TILs.'''
    dirs = [x for x in os.listdir('.') if os.path.isdir(x) and
            '.git' not in x]
    return dirs


def get_title(til_file):
    ''' Read the file until we hit the first line that starts with a #
    indicating a title in markdown.  We'll use that as the title for this
    entry. '''
    with open(til_file) as _file:
        for line in _file:
            line = line.strip()
            if line.startswith('#'):
                return line[1:].lstrip()  # text after # and whitespace


def get_tils(category):
    ''' For a given category, get the list of TIL titles. '''
    til_files = [x for x in os.listdir(category)]
    titles = []
    for filename in til_files:
        fullname = os.path.join(category, filename)
        if (os.path.isfile(fullname)) and fullname.endswith('.md'):
            title = get_title(fullname)
            titles.append((title, fullname))
    return titles


def get_category_dict(category_names):
    categories = {}
    count = 0
    for category in category_names:
        titles = get_tils(category)
        categories[category] = titles
        count += len(titles)
    return count, categories


def print_file(category_names, count, categories):
    ''' Now we have all the information, print it out in markdown format. '''
    with open('README.md', 'w') as file_:
        file_.write(HEADER)
        file_.write('\n')
        file_.write('_{0} TILs and counting..._'.format(count))
        file_.write('\n')
        file_.write('''
---
### Categories
''')
        # print the list of categories with links
        for category in sorted(category_names):
            file_.write('* [{0}](#{1})\n'.format(category.capitalize(),
                                                 category))

        # print the section for each category
        file_.write('''
---
''')
        for category in sorted(category_names):
            file_.write('### {0}\n'.format(category.capitalize()))
            file_.write('\n')
            tils = categories[category]
            for (title, filename) in sorted(tils):
                file_.write('- [{0}]({1})\n'.format(title, filename))
            file_.write('\n')

        file_.write(FOOTER)


def create_readme():
    ''' Create a TIL README.md file with a nice index for using it directly
        from github. '''
    category_names = get_list_of_categories()
    count, categories = get_category_dict(category_names)
    print_file(category_names, count, categories)

if __name__ == '__main__':
    create_readme()
os.system('git add README.md')
Make the necessary changes in the above file and save it. And, now run the following command in your parent directory i.e. “til”. By doing this, every time you will be making a commit, the README.md file will be updated automatically.
cd .git/hooks/ && ln -s ../../createReadme.py pre-commit && cd -
Time to do the initial commit. Add all the files for commit and check status and make the initial commit:-
$ git add *
$ git status

On branch master

No commits yet

Changes to be committed:

(use "git rm --cached <file>..." to unstage)

new file:   "Name of files will be displayed here"

# Then make the initial commit.

$ git commit -m "Initial Commit"
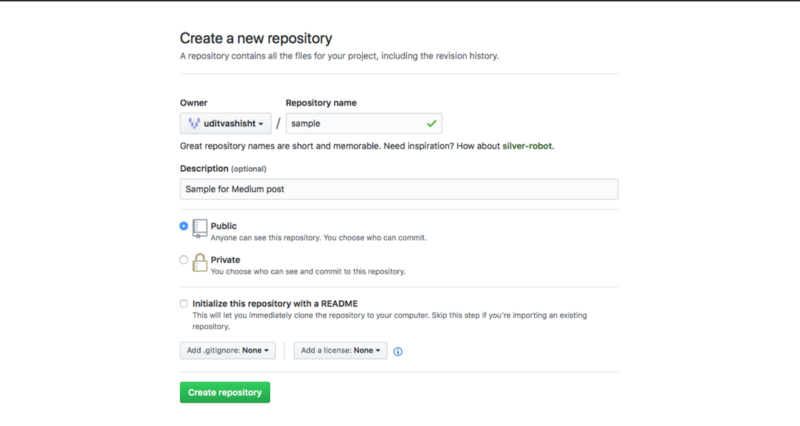
Let’s get to the GitHub part now. Open your GitHub account or create one if you don’t already have it. Now, click on “New Repository” on the right.

Select, the ‘Repository name’, ‘Description’ on the next page. Don’t check ‘Initialize this repository with a README’ and keep ‘Add .gitignore’ and ‘Add a license’ as none.

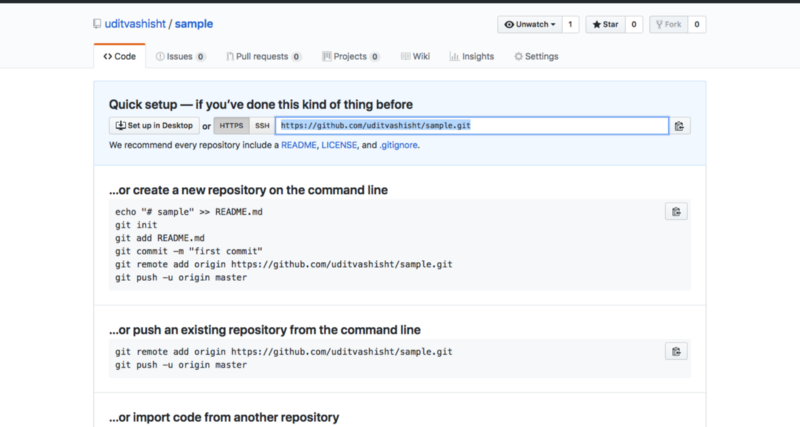
On creating the repository, you will get the following page. Copy the https URL from there

Now, add the remote origin using the following lines of code :-
$ git remote add origin https://github.com/username/repository.git
Finally, time to push your repository to GitHub:-
$ git push origin master

#It will ask for the username and password for your GitHub account
Username for 'https://github.com':
Password for 'https://uditvashisht@github.com':
It could be tiring to add the username and password everytime you push data to the remote. However, you can cache your GitHub password in Git using the following command. For more information click here.
$ git config --global credential.helper osxkeychain
Git, by default cache the username/password for 15 minutes, if you use the above command after 15 minutes of entering the credentials. You will have to fill them once again and then they will be cached until you delete them.
So now, time to add some codes/snippets to our repository. If you would have gone through the python code above. You will find that it fetches the category from the name of the directory and the title in the markdown as the title for “til”. Let’s create a directory named “git” inside the til folder. We will be writing a TIL about caching the password as we did above. Create a file inside the git directory with a suitable name. ( I use SublimeText3 as my default editor. Check here )
$ mkdir git
$ subl git/caching-github-password.md
Now, we will be creating the file using Markdowns. I will first create the file and then walk you through the usage of markdowns.
# Caching Your GitHub Password on git

To cache your GitHub password on git, use the following command on terminal:-

`git config --global credential.helper osxkeychain`

To delete your password from cache, use this:-

git credential-osxkeychain erase
host=github.com
protocol=https
[Press Return]


Visit [this page](https://help.github.com/articles/caching-your-github-password-in-git) for other Operating System
Let’s quickly go through the Markdown.
# in markdowns is same as <h1> in html. Hence ## is <h2> and onwards
`code` for inline codes

[text](link) will add the hyperlink (No whitespace between '](')

You can add a linebreak using "\" at the end of a line. But I prefer hitting the return key twice.
You must note that the first line starting with # will be used as the title of the “TIL”. Before committing your file to the remote, you can check your markdown online here .
After saving the file, add it to the staging state, commit and push to the remote:-
$ git add *
$ git commit -m "Cache Your GitHub Password on Git."
$ git push origin master
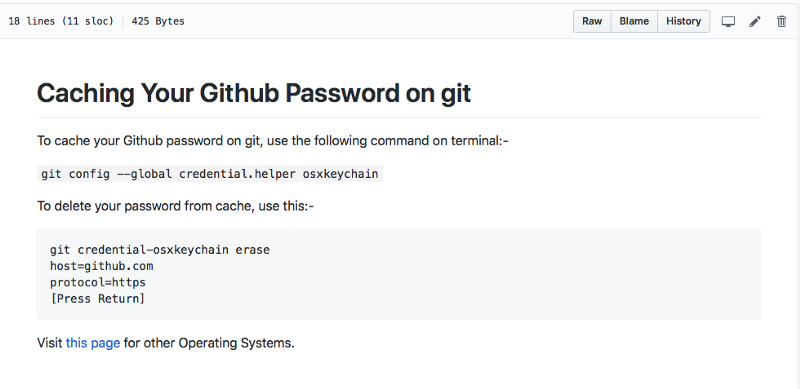
If you have followed the instructions, the TIL on the repository will be like this:-


