


How to start a new iOS project in Xcode?
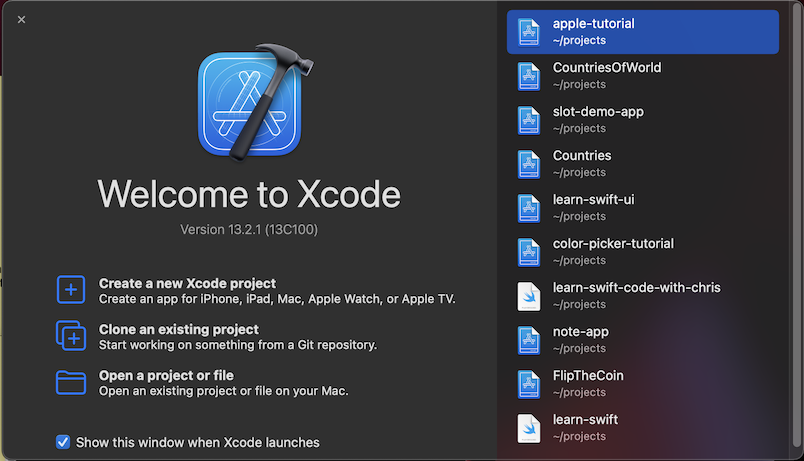
To create a new ios project, Open Xcode on your Mac and click on ‘Create a New Xcde Project’
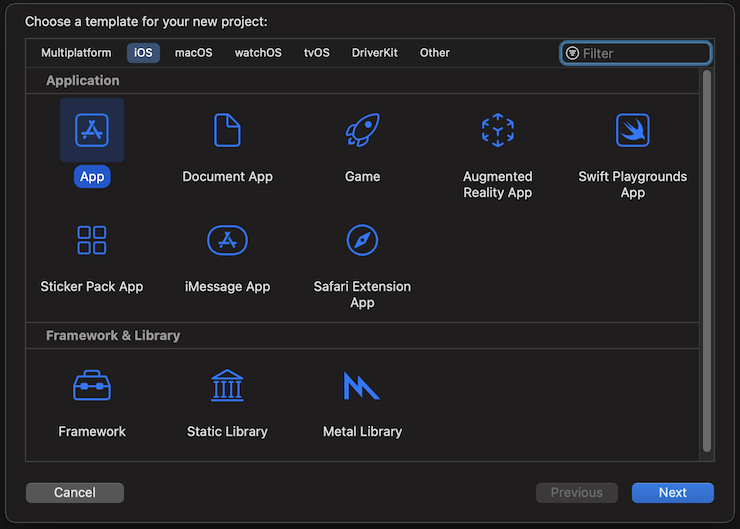
In the next window, select ‘ios’ from the top menu and then select ‘App’ and click on Next
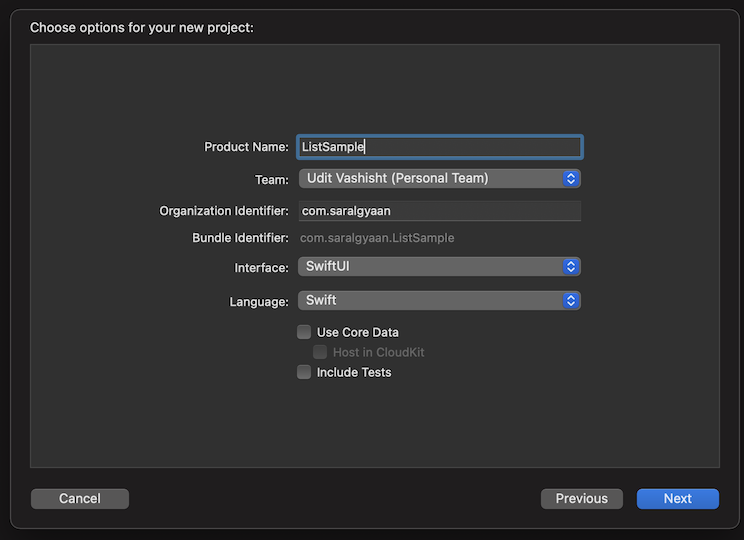
In the next screen, choose the name of your app e.g. “ListSample” and leave everything else as it is i.e. Interface - SwiftUI, Language - Swift, and Use Core Data, Include Tests untick, save it at your desired location and start the project.
Note - This app will have SwiftUI Life Cycle and you won’t get the old StoryBoard options of UIKit, if you still wish to have it choose StoryBoard in the Interface
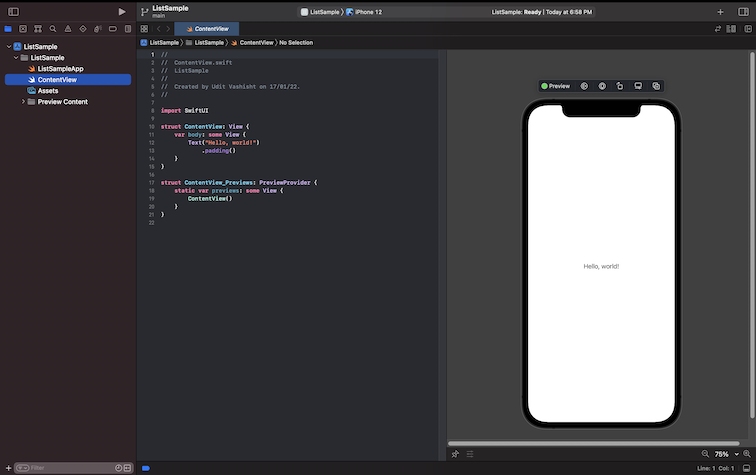
In the next window, you will get the playground to code into, To the very left you will get the list of all the files to work on. For this tutorial, we will be using ‘ContentView.swift’ file, clicking on it would open it on the editor to the right and you can open a canvas of your favorite device to see the live preview of the code.
First of all we will declare a Item struct, it would have two properties, id and name at the very top outside the ContentView struct. Our code would look like this:-
import SwiftUI

struct Item : Identifiable {
    var id : UUID
    var name : String
}

struct ContentView: View {
Basically, we need to have just the name of the item, but we have used id and given it default kind UUID so that we can make this struct identifiable and use it in For each function of list.
Now, we will create an array of Items in the ContentView
var items = [Item(id:UUID(), name:"First Item"),Item(id:UUID(), name:"Second Item") ]
Now in the body, we will show the list :-
         List{
            ForEach(items){item in
                Text(item.name)
            }
        }
The complete code till now looks like this:-
import SwiftUI

struct Item : Identifiable {
    var id : UUID
    var name : String
}

struct ContentView: View {

    var items = [Item(id:UUID(), name:"First Item"),Item(id:UUID(), name:"Second Item") ]

    var body: some View {
        List{
            ForEach(items){item in
                Text(item.name)
            }
        }
    }
}

struct ContentView_Previews: PreviewProvider {
    static var previews: some View {
        ContentView()
    }
}
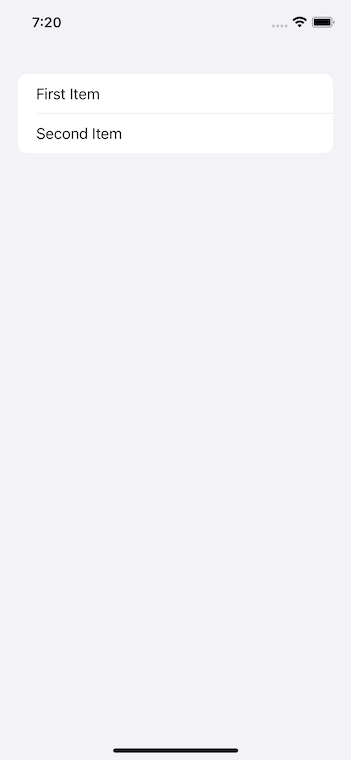
And the preview looks like this:-
How to add functionality of deleting an item in List View of Swift UI?
Now, we will add a delete functionality to delete the item using the swipe option and change our code of list to as under:-
List{
            ForEach(items){item in
                Text(item.name)
            }
            .onDelete(perform : {IndexSet in for
                 index in IndexSet {
                items.remove(at: index)
            }
            })
        }
Also, we will make our items a State Property so that it can identify a change in the app and get modified accordingly.
@State var items = [Item(id:UUID(), name:"First Item"),Item(id:UUID(), name:"Second Item") ]
How to add an option to move the items of list in SwiftUI?
Now, we will add an option to move the objects and for that we will and onMove() to the list
.onMove(perform: {
                indices, newOffset in
                items.move(fromOffsets: indices, toOffset: newOffset)
            })
But for this to work, we need to be in edit mode and for that we need an edit button, the quickest way of having an edit button is by having it at the very top. So we will add a NavigationView to our List View and add the navigationBarTitle
  NavigationView{

            List{
                ForEach(items){item in
                    Text(item.name)
                }
                .onDelete(perform : {IndexSet in for
                     index in IndexSet {
                    items.remove(at: index)
                }
                })
                .onMove(perform: {
                    indices, newOffset in
                    items.move(fromOffsets: indices, toOffset: newOffset)
                })
            }
            .navigationBarTitle(Text("To Do"), displayMode: .large)

        }
One more thing to note here is that the .navigationBarTitle() modifier is not applied to the NavigationView but to it’s child.
How to add edit button in list in SwiftUI?
Now to add the edit button :-
.navigationBarTitle(Text("To Do"), displayMode: .large)
            .toolbar(content: {
                EditButton()
            })
Now, in your live preview, you can see that you can have got the edit button, where you can click and then move the items up and down.
Now, we can also add an optoin to create a new item for the modify your code to as under:-
 .navigationBarTitle(Text("To Do"), displayMode: .large)
            .toolbar(content: {
                ToolbarItemGroup(placement: .navigationBarTrailing){
                    EditButton()
                    Button(action: {
                        items.append(Item(id:UUID(), name:"New Item"))
                    }, label: {Image(systemName: "plus")})

                }

            })
We can further link it to the next page by just using the NavigationLink
 List{
                ForEach(items){item in
                    NavigationLink(destination: {
                        Text("Destination \(item.name)")
                    }, label: {Text(item.name)})
                }
Now, we have got small navigation icons at the end of each row and we can navigate to the next page, which for now will only show the Desitination and name of the item.
Sample code to create a List View in Swift UI
The complete code upto this point is as under:-
import SwiftUI

struct Item : Identifiable {
    var id : UUID
    var name : String
}

struct ContentView: View {

    @State var items = [Item(id:UUID(), name:"First Item"),Item(id:UUID(), name:"Second Item") ]

    var body: some View {
        NavigationView{

            List{
                ForEach(items){item in
                    NavigationLink(destination: {
                        Text("Destination \(item.name)")
                    }, label: {Text(item.name)})
                }
                .onDelete(perform : {IndexSet in for
                    index in IndexSet {
                    items.remove(at: index)
                }
                })
                .onMove(perform: {
                    indices, newOffset in
                    items.move(fromOffsets: indices, toOffset: newOffset)
                })
            }
            .navigationBarTitle(Text("To Do"), displayMode: .large)
            .toolbar(content: {
                ToolbarItemGroup(placement: .navigationBarTrailing){
                    EditButton()
                    Button(action: {
                        items.append(Item(id:UUID(), name:"New Item"))
                    }, label: {Image(systemName: "plus")})
                }
            })
        }
    }
}

struct ContentView_Previews: PreviewProvider {
    static var previews: some View {
        ContentView()
    }
}
So, our code is ready and working, but the only issue with it the code has become very long and if we have to add more functionality, it will further make the code more hefty and unmanageable. So to solve this issue, we tend to use MVVM which stand for Model View View Model Pattern and in our next tutorial, we will turn our code to use the benefits of MVVM thus making it more usable.